// AI Tools
Build Nullform Website
Instruction on how to build a brand website from scratch with Claude Fable 5
From One Brand Guideline to a Full Interactive Website
The exact Claude Fable 5 workflow behind the NULLFORM site (my imaginary fashion brand).
What you need: Claude (Claude Code gives the best results: it can create files, run scripts, and test the site for you; claude.ai with Artifacts also works), one brand guideline image, and 3–5 product/model photos (I used GPT Image 2.0 on Higgsfield to generate the collection based on my preference)
Time: ~1 hour including adjustments.
Step 0 Prepare brand guideline image
Go to GPT Image 2.0, drop this prompt and attach one product image for reference.
A professional, high-end brand identity guideline presentation template for a [BRAND TYPE/INDUSTRY] brand named "[BRAND NAME]". Elegant, clean UI/UX multi-panel dashboard layout displaying visual asset rules on a dark background.

The top panel features a large full-body hero image of [DESCRIBE THE HERO FOCUS/STYLE] on a dual-tone split background.

The layout includes distinct, perfectly organized infographic sections divided by thin horizontal rules:
1. "01 BRAND CONCEPT & PILLARS" with clean text blocks and 3 minimal geometric circular line-art icons.
2. "02 COLOR PALETTE" showing a row of 4 precise color swatch squares with hex codes underneath.
3. "03 TYPOGRAPHY" displaying a bold, wide sans-serif logo and sample body text blocks.
4. "04 PHOTOGRAPHY RULES" with 3 circular diagram icons and bullet points of text rules.
5. "05 LOOK & FEEL REFERENCES" showing a horizontal grid row of 6 clean, consistent macro and micro photography references.

Graphic design, professional branding showcase, sharp typography, minimalist layout, extreme detail, high contrast, studio editorial presentation, 8k resolution. --ar 2:3
Step 1 Make Claude the brand expert first (don't ask for the website yet)
Drop your brand guideline image + photos into a folder (or the chat) and start with a brief, not a build. This is the step most people skip and it's why their results look generic. The brief becomes the "brain" every later prompt draws from.
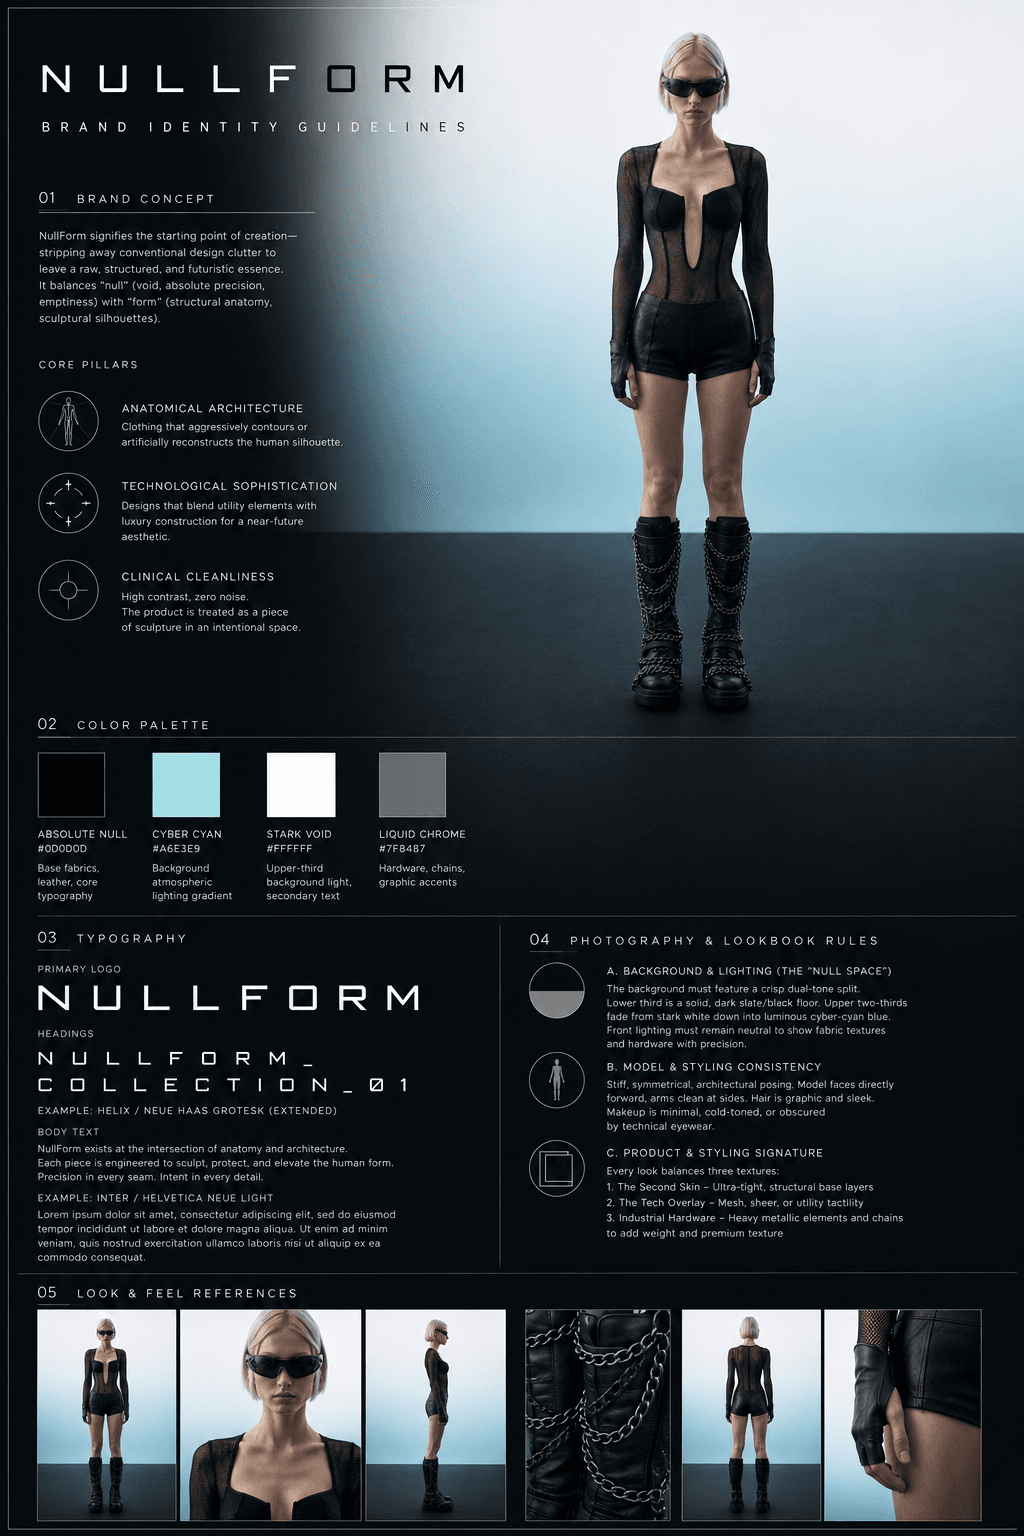
I'm attaching the brand guideline for [BRAND NAME], a [ONE-LINE BRAND
DESCRIPTION]. Before writing any code, create a project brief
(PROJECT.md) that covers:

1. The complete design system extracted from the guideline: color
   palette with hex codes, typography rules, and art direction.
2. A website concept that expresses the brand: section structure,
   signature interactions, and motion principles.
3. A proposed tech approach and an asset checklist.

Goal: a highly interactive, futuristic single-page brand experience.
Audience: [WHO THE SITE IS FOR]. No code yet, brief first.
Claude will extract your color hex codes, typography rules, photography style, and brand pillars into a project brief and propose the site concept, sections, and interaction ideas before writing any code.
Step 2 Build v1 with a vibe + one concrete anchor
Don't over-specify. Give Claude the feeling you want plus one concrete direction, and let it make design decisions from the brief.
Build the first version from the brief. Design intent:

- The landing moment should immediately convey [THE FEELING — e.g.
  "a luminous blue, futuristic, minimal void"].
- Prioritize 2–3 signature interactions executed well over many
  small effects. Choose them from the brand story.
- Stay strictly within the brand's colors and typography rules.
- Respect accessibility basics (reduced motion, keyboard, contrast).

Show me a working preview when it's ready.
You'll get a working site: in my case a terminal boot screen, a scroll journey from light into darkness, glitch-decode text, a custom cursor, and an interactive lookbook.
Step 3 Art-direct in plain language
Of course the v1 will never be perfect, so I made some changes by with direct prompt in Claude.
Iterate like you're talking to a designer, not a computer. Batch a few changes per message, and be blunt about what's wrong. In my case, I want the character to blend in the background + the logo to be more visible, also to fix the distortion of the size within Collection grid.
Fun fact: I asked Claude to remove a background, and it literally wrote its own Swift script to run my Mac's Vision AI and crop the model out. It is getting way too smart. Love that I don't have to constantly switch between tools to prep the image anymore.
Step 4 Make Claude test its own work
Before sharing, have it verify instead of eyeballing.
Run a QA pass before I share this:
1. Verify responsive layout and scroll behavior on mobile, tablet, and desktop, emulate real devices rather than just resizing.
2. Check the interactive elements: overlays, hover states, forms.
3. Fix what you find, then report what was tested, what broke, and what you changed.
In Claude Code, it can actually launch a headless browser and test your site on emulated iPhone/iPad viewports, mine caught a scroll bug in the detail overlay this way.
Quick Summary
- 1.Step 1: Feed the Brain: Upload your brand guideline and photos first to let Claude map out colors, typography, and concepts before writing any code.
- 2.Step 2: Start with a Vibe: Prompt with a general aesthetic and one concrete feature anchor, letting Claude handle the initial design decisions.
- 3.Step 3: Art-Direct like a Human: Batch feedback in plain language to tweak layout details. (Bonus: Claude can even write custom local scripts, like using Mac's Vision AI, to auto-remove asset backgrounds).
- 4.Step 4: Auto-Test: Use Claude Code to run headless browser tests across emulated mobile viewports to catch and fix layout bugs automatically.
// stay updated
Get workflows like this in your inbox
New UGC techniques, AI tools, and creative workflows — straight to your inbox.
// next step
Ready to scale this?
I help creators and brands build end-to-end UGC workflows that drive sales. From workflow automation to content strategy, let's create a system that works.
Work with me →